Welcome
Hello new user, once you have registered and your account has been approved, you can start using the SucculentGuide.com
Custom Nomenclature Application to reflect your own taxonomic system. This is a powerful system that approved users may employ for
their own personal use or to share their taxonomic ideas with others. This page is written to introduce you to the features and help
you get started with the application.
Step 1 - Login
Logging in is straight forward. On the Login Page, enter the
user name and password that you selected when you registered and click the "Log In" button.
If your login is successful, you will be taken directly to your user control panel (Figure 1). If your user name has not been activated, or if the
login was incorrect, a warning message will display alerting you of the problem. If you registered recently and have not received a
confirmation e-mail from Daiv activating your account OR if your account has been deactivated, you will see a notice which confirms
that your login was correct, but is not active. All accounts are manually activated by Daiv to prevent
SPAM or other misuse of the system. Lastly, if the login name or password were incorrect, you will be notified and prompted to try the
login again. Links are provided to request a new password or e-mail Daiv for help.
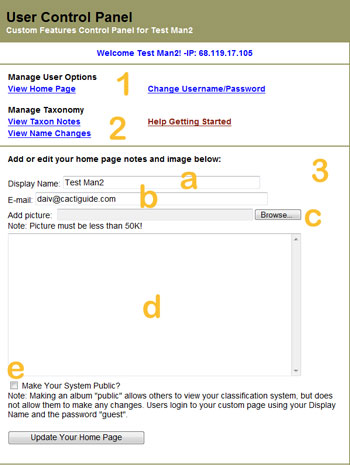
Figure 1 - Control Panel Screen Shot
Step 2 - Your Home Page
Clicking the "View Home Page" link on the control panel will take you to your Custom Nomenclature Home Page. A note will
inform you that your home page is blank until you add content to it. (Figure 2 #2) Approved users will be shown a link to your "Home Page Editor" which is discussed next. (Figure 2 #1) On systems that have been made public, this is the page that your Guest will see, but
without the links to the Home Page editor. This page should contain a description of your system and the
reasoning behind it. A small image may also be displayed on this page.
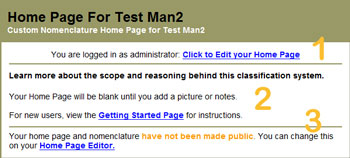
Figure 2 - Guest Home Page Screen Shot
Step 3 - Edit Your Home Page
To "Edit Your Home Page", use the form at the bottom of the control panel. (Figure 1 #3). You can also access
this page from the link on your guest home page or by clicking your login name on the Custom Nomenclature bar at the
top of every page. Guest users do not have access to this page. Below is a description of the various
actions that can be performed on this page listed in order as they appear on the page from top to bottom:
- View Home Page - This link takes you to your guest home page. (Figure 1 #1)
- Change Username/Password - Click here to reset either your login name or password. (Figure 1 #1)
- View Taxon Notes - This link takes you to a page that shows all of the notes you've added for each taxon or genus. (Discussed further below.) (Figure 1 #1)
- View Name Changes - This link takes you to a page that shows all of the changes you have made with an option to undo any
of those changes. (Discussed further below.)(Figure 1 #2)
- Help Getting Started - This link takes you to the "Getting Started" page. (You are on this page now!)
- Edit Home Page Form - This form contains the fields of your user account and the ability to update/edit the following:
- Display Name - This is the name that your guest users see. This must be different than your login name. I also ask that you
make this a real name such as "John Smith" and not something like "jsagave" or other made up name. The custom nomenclature
page is for serious users and while users don't have to make their system public, I still want to know who you are - it is not intended for
anonymous users. This name can be the name of a publication such as "The Euphorbia Journal"or a company name such as "Bob's Cactus & Succulent Nursery".
- View Taxon Notes - This link takes you to a page that shows all of the notes you've added for each taxon or genus. (Discussed further below.) (Figure 1 #a)
- E-mail - your e-mail address. You can change your e-mail address, but be sure to remember which one you used and that it is a valid e-mail.
This address will be used if you forgot your password and also by me if I need to contact you for something. This e-mail is not displayed to anyone
else and is not shared in any way. (Figure 1 #b)
- Add Picture - This features allows you to upload an image to your home page. This is not required, but recommended. If the user is a publication
a picture of the cover is best. For individuals a portrait image should be used. This is not an "avatar"! If you do not wish to
upload a picture of yourself (strongly recommended), then leave it blank. Please do not upload cartoons, flowers, or other "cute"
pictures. For nursery users, a company logo is recommended. There is a 50K file size limit on the picture. I recommend not using an image
larger than 200 x 300 pixels. You must size the image before uploading. (Figure 1 #c)
- Text Area - The text box below the picture is where you enter general information about your taxonomy. You can add any information
here that you think is relevant to your system. Primarily this will be a discussion of which genera are affected and the reasoning
behind your choices. This information together with the picture (mentioned above) will constitute your Guest Home Page. Some
HTML tags are allowed in this field if you know how to use them.
The current allowed tags are:
<p> - paragraph
<br> - line break
<hr> - horizontal rule
<b> -bold
<i> -italic
<ul> -unordered list
<li> -list item
Use of tags must be limited for security reasons, but some more can be added, if requested. Please e-mail me if you would like to use a specific tag. (Figure 1 #d)
- Make Public - Checkbox that makes your system public when checked. Default is not public. When your system is made public, users can log in using
your Display Name and the password "guest". Public systems also show changes on the "alternate taxonomy chart available to all visitors
even if they are not logged to your system. I may make this display user-controlled in the future. (Figure 1 #e)
- Update Button - click to set any changes you made to the form above
- Log Out - click this link to log out. This can also be done on the header bar on each page where it says "Log Out" next to your user name.
Step 4 - Setting a New Name
Setting names is the heart of the custom nomenclature application and is extremely easy to do. After you log in for the first time, the left
nav-bar (that is the list of all the genera on the left of the page) will reflect the default classification on the site. Click on a genus that
you wish to re-classify or remove. If only one species is listed, you will be taken directly to a detail page. If more than one species is
listed, you will be taken to a list of species from 2 on up. Subspecies, varieties and forms of a species are all listed on the same detail page for that
species. To modify a species, you must be on the detail page. For monotypic genera, this will be the first click off the nav-bar, for genera with
more than one species, you will need to make a second click on the species you want to modify. Again, ranks below species level will be found on the
species page. Here is a step by step example for changing Ariocarpus retusus ssp. trigonus to the rank of species:
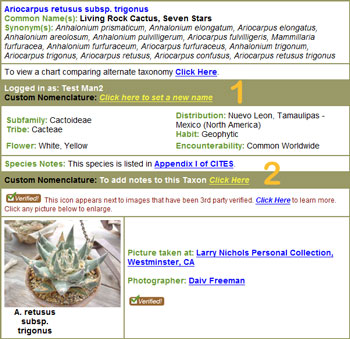
Figure 3 - Species Detail Screen Shot
- Click Ariocarpus on the left nav-bar
- Scroll down and click on Ariocarpus retusus
- Scroll down to Ariocarpus retusus ssp trigonus
- Notice the brown bar with the text "Logged in as: [your display name]"
- Click yellow link next to it that reads "Click here to set a new name" (Figure 3 #1)
- You will be taken to a new page with a list of radio buttons and names. (Figure 4) The current name will automatically be selected. Select the new
name you want to use (Ariocarpus trigonus in this example) and then click the "Set New Name" button. The name will
then be changed in your system permanently unless you decide to change it. If the new name you want to use is not listed, see Step 5
below. If you want to undo a change, see Step 6 below.
- There is an option for every taxa to completely remove the name from your system. To do this, follow the steps above, but instead of
selecting one of the available names, choose the radio button: "Remove From My Taxonomy" (Figure 4 #3)
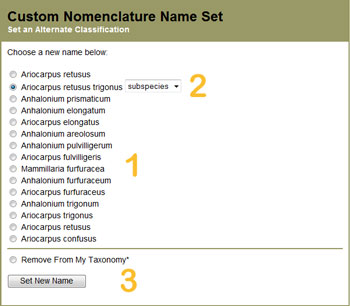
Figure 4 - Name Set Screen Shot
Step 5 - Requesting a Name Entry
When you are on the "Name Set" page described in step 4, you may find that the new name you wish to use is not available in the
list of choices. In this case, you can submit the desired name on the form provided at the bottom of the "Name Set" page. Genus and Species are
required. Please also provide any notes that may be relevant in the space provided. The taxa that your request was sent from will be included in the
message to me. If you want to add a name that is independent of any taxa in the default classification, please make a note of that. This is by far
the most laborious part of the system, but it is necessary to do it this way to preserve the integrity of the entire system and will only get easier as over
time.
Step 6 - Unsetting a Name Change
The easiest way to unset a change you've made is to follow the link from your "Home Page Editor" - see Step 3, #2 above. On this page a
list of all the name changes you have made will appear. The default name will show under "Old Name" with the "New Name" next to it.
To the right of the two names you will see a link that says >>Undo< < simply click the link to unset the name change. (Figure 5 #1) The record will revert back to to the
default system. If you did not set a new name, but removed the record, it will say "Record Removed" next to the old name. This is undone in the same manner.
Note: Sometimes multiple names will be combined into a single taxa. In this instance, there will be duplicates of the "New Name" on the list of
name changes. Be sure you unset the correct "Old Name" in this case. A notice will also appear on the detail page for the taxa whenever more than
one taxa are combined.
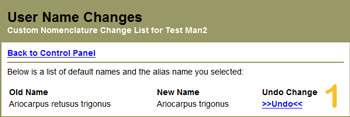
Figure 5 - Unsetting a Name Change Screen Shot
Step 7 - Adding Notes
While browsing the list of names, you will see the option to add notes per genus or per individual taxa.(Figure 3 #2) Simply click the yellow link,
type the notes you wish to add in the space provided, and click the add notes button. The same HTML tags are allowed in this field as
described above for your "Home Page". (Step 3, #5) if you know how to use them. These notes do not replace the existing notes and
will be identified as notes you have added.
Step 8 - Managing Notes
You may view and edit all your existing notes by following the link from your "Home Page Editor" - see Step 3, #3 above. Follow the link
to edit your notes. (Figure 1 #2) If you want to completely remove the notes, simply delete all the content and submit. The notes will be removed if blank.
Conclusion
The above instructions are given in fine detail and may seem overwhelming at first. Please do not dismay! The system is quite simple to use and
once you try a few changes, you will soon see how easy it is. It is my hope that this proves a useful tool for all cacti enthusiasts whether they
have a system of their own or simply learn from others. If you need assistance with anything, feel free to contact me via the e-mail below. I will
be happy to assist you!
|