Time is money! The economics of running a specialty cactus nursery do not afford many to hire all the help they need. As a result,
owners are forced to put in more of their own time to cover those tasks. The SucculentGuide.com NurseryLink is designed to be as efficient and user-friendly
as possible so you don't have to sacrifice even more of your valuable time.
Daiv Freeman
Note: The screenshots and videos on this page are from the sister site CactiGuide.com. All of the functions of the NurseryLink are identical between
the two sites and your login and reports are shared between the two sites. You do not need a separate log in to access CactiGuide.com NurseryLink features!
Welcome
Hello new user, this page will explain all of the available features of the SucculentGuide.com NurseryLink application and
describe how to use them. For your convenience, you can view the content on this page as a video tutorial by clicking the video links under
each heading. As you will quickly learn, the NurseryLink is very easy to use and is extremely flexible. The features have
been designed with from the ground up with results in mind. For more information on why you should be using the NurseryLink application,
visit: NurseryLink Benefits. The screenshot below corresponds to the rest of the text on
this page. If you need a better view, you can click and enlarge it to full-size.
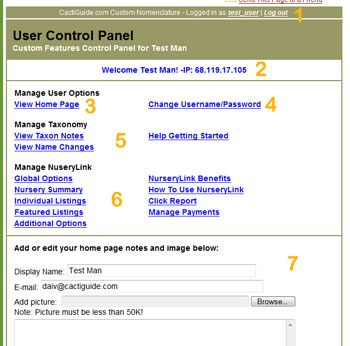
Figure 1 - Control Panel Screen Shot
Tutorial Video 1
Logging in is very straight forward. On the Login Page, enter the
user name and password that you were assigned by Daiv and click the "Log In" button. Aside from this link, you can access the Login page by
clicking the "Login" link on the brown bar at the top of every page. (Figure 1 #1) When you are logged in, the text "About this | Login" will
be replaced with your username and a "Log Out" link. Clicking on your username will bring you to your control panel. Clicking on "Log Out" will log you
out. While your account will automatically log out if you are inactive for a long time, it is best to log out manually if the computer you are using can be accessed by others.
When you log in, you will be taken to your control panel as seen above in Figure 1. If your user name has not been activated, or if the
login was incorrect, you will get a warning message that tells you what is wrong. If the login name or password were incorrect, you will be notified and prompted to try the
login again. Links are provided to request a new password or you can e-mail Daiv for help.
Step 2 - The Control Panel
Tutorial Video 2
After a successful login, you will see a welcome message and your IP address (Figure 1 #2). Your IP address is shown so that you
can compare it with the IP addresses on your Click Report and be sure that you are not paying for clicking on your own links.
More on this later. Below this are 3 sections of links: "Manage User Options" (Figure 1 #3, #4), "Manage Taxonomy"
(Figure 1 #5), and "Manage NurseryLink" (Figure 1 #6). Finally, there is an editable form on the lower part of the page (
Figure 1 #7). The focus of this page is the "Manage NurseryLink" section, but we will discuss the others briefly in the
next step. For a complete explanation of these other features visit: Help Getting Started
(also found under the Taxonomy section of the control panel).
Step 3 - Home Page and Taxonomy
Tutorial Video 3
Using the "Custom Nomenclature" application is entirely optional, but can make your links more effective. You can read
about this feature in detail on this page. As you see, you have the ability
to apply any taxonomy you prefer to the taxa listed on SucculentGuide.com. Setting the names for your user account to match
the names you use on your web site helps eliminate confusion when people click from one listing on SucculentGuide.com to that
listing on your own web site For example: Under the SucculentGuide.com default taxonomy, you will find the listing -
Rebutia canigueralii. This same plant on your web site may be listed as Sulcorebutia rauschii. Any time
this difference in names occurs, the NurseryLink application recognizes the change and alerts the visitor of the name
you use for this plant. In this way, they will know what to look for on your web site This is especially helpful if
you do not have a specific page for each taxa, but link only to your home page or a list of names.
Before moving on to the NurseryLink, note that your "Home Page" (Figure 1 #3) is reserved for notes on
taxonomy and does not need to be made public in order to use the NurseryLink feature. The details of your Nomenclature
"Home Page" are modified using the form at the bottom of your control panel (Figure 1 #7). Two fields on
this form are used by both features, the "Display Name" and the "E-mail". The "Display
Name" is what visitors will see along with all your NurseryLink listings and detail pages. This should be the
name of your Nursery or at least your full name. It is not the same as your username which you use to log in. Your
username can be changed under the "Change Username/Password" link (Figure 1 #4).
This e-mail address is only used internally and is never displayed to anyone except you. To give visitors
access to your e-mail address, you can set this under your "Nursery Summary" section of the
NurseryLink menu.
Step 4 - NurseryLink Overview
Tutorial Video 4
Now that you know what to expect when you are logged in, you can get started on using the NurseryLink application. Under the heading,
"Manage NurseryLink", there are two columns menu of links. (Figure 1 #6) At the top of the right-hand column are links to the
explanation pages. The NurseryLink Benefits page, also mentioned above is a
good place to start. And of course you are now reading the "How To Use NurseryLink" page. If you leave this
page, just click the link on the control panel to get back to it.
For easy reference a summary of these features will be listed and details of each found further down the page:
- Global Options - Start here - these are settings that don't change often and always apply -such as your country of origin.
- Nursery Summary - These settings display variously on the list of nurseries as well as individual supplier pages.
- Individual Listings - This is a summary of cactus species that you have listed. You can edit and delete existing listings from this page.
- Featured Listings - Add/edit special listings that display on your specific supplier page.
- Additional Options - Set even more options to attract visitors including links to network sites.
- Click Report - This report gives you detailed and searchable data about all the clicks your listings have received.
- Manage Payments - This page makes it easy to see how much you have spent, already paid, and still owe.
Step 5 - NurseryLink Details
Tutorial Video 5.0
Now we'll look at each NurseryLink function individually and discuss how they work. The first thing we're going to discuss, is actually not on the list
above. This is the most basic part of the NurseryLink feature - adding an individual listing. To make this description easier to follow,
we will look at another screen shot:
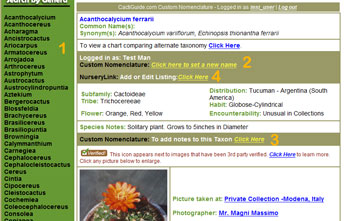
Figure 2 - Add Listing Screen Shot
Again, the image can be enlarged to full size if you need a better view. To add an individual listing, you will need to navigate to
the species on the left-hand nav-bar of SucculentGuide.com AKA the "genus list". (Figure 2 #1) If the name you are looking
for isn't listed, you'll need to go to the home page and use the Name Search to find
the synonym used by default. You can then navigate to that synonym using the left nav-bar (Figure 2 #1) and reset the name to
match your own taxonomy via the Custom Nomenclature application. (Figure 2 #2) Note: You may also set notes for each taxon (Figure 2 #3),
but those are not visible to visitors unless you make your nomenclature public and they login as a guest of your system. See the
Help Getting Started page for more about that feature.
When there are no discrepancies with taxonomy, then click the "Add or Edit Listing" link. (Figure 2 #4) This will bring
you to the "Manage Listing" page, which we will discuss below under the heading Individual Listings. When an
individual listing is added through this function (and it isn't deactivated by you), it shows up under the species detail
for that species to all visitors. (Figure 3 #1)
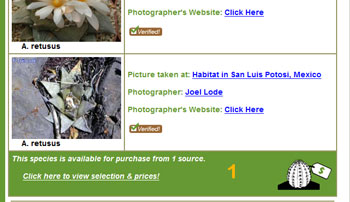
Figure 3 - Active Listing Screen Shot
1. Global Options-
Tutorial Video 5.1
Use Figure 4 (below) as a reference for the Global Options function. As the name implies, the options set on this
page are general settings that will not change often. The first setting is to select which country you are located in. (Figure 4 #1)
This setting is important as it will alert visitors before they click if an order would have to ship international. Many potential
buyers might not be interested in doing this. Likewise, many suppliers may not want to ship international. As a supplier, you
can set an option here to alert visitors that you do not ship internationally. (Figure 4 #2) The next option will be to set your currency. (Figure 4 #3) I've listed
the major types of currency, but if you do not see yours listed you can send me a request and I will add it. It may seem like the
currency would obviously be that of the supplier's country, but since the listings are on a U.S. web site, it is best to specify this
for clarity.
The notes field (Figure 4 #4) is where you should add notes that will appear next to every listing. This prevents you from having to
re-type this information over and over again. Things to include here may be notes on shipping such as: "Ships FedEx only" or
"We ship all plants bare root unless otherwise noted.". You can also list exceptions to international shipping if there are
some countries you do ship to and others that you do not. This situation may be common in Europe. Finally, there is a "Browse" button
that you can click to select a PDF or Word DOC off your computer to upload to the SucculentGuide.com server. (Figure 4 #5) This is for catalogs and/or
seed/plant lists. You must use a file smaller than 3MB.
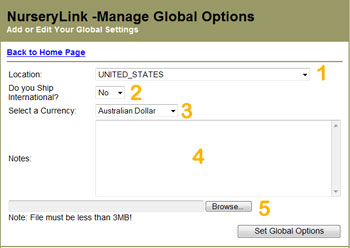
Figure 4 - Manage Global Options Screen Shot
2. Nursery Summary-
Tutorial Video 5.2
Use Figure 5 (below) as a reference for the Nursery Summary function. The details of the Nursery Summary
function are primarily for display on the Nurseries page, but also shows up on each
supplier's detail page where featured listings are also displayed. This information must be filled out in order for you to show up
on either page. Going through the list of fields from the top, down -we start with the "Sub-Title" field.(Figure 5 #1) This is an optional field
that should be a "tag-line" for your nursery. A slogan that you might put on your stationary, for example.
After "Sub-Title", we have an image field. You can browse to an image on your machine and upload it here. (Figure 5 #2) Ideally, this should
be your nursery logo and it cannot be larger than 50K or bigger than 200 x 200 pixels. Following this, there are three address fields (Figure 5 #3),
two phone number fields and a fax field (Figure 5 #4), and two e-mail fields (Figure 5 #5). These are all optional fields and you can fill these
out or not fill them out as you desire. They should not be used for anything other than what they are intended for. That is only put an address in
the address field or leave it blank. Do not try to post sales offers or anything else in these fields. The web site URL is not optional and should be
a link to your web-site home page, but you may link to any page on your site. (Figure 5 #6)
The last field is a text area where you can enter a summary
paragraph or two about your nursery. This is limited to 300 characters and a counter is provided to help you stay within that limit. Remember,
this is a summary, not a full description of everything you do. (Figure 5 #7) You can enter a long description on the
Additional Options page. On your supplier page, the summary will be used if there is no long description or
replaced by the long description if it is filled out.
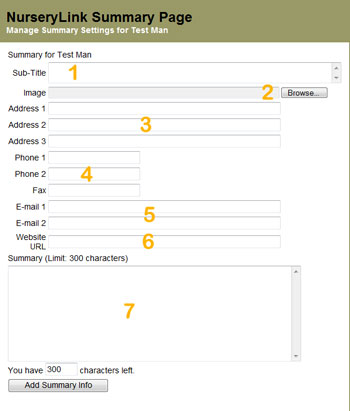
Figure 5 - Nursery Summary Screen Shot
3. Individual Listings-
Tutorial Video 5.3
The management page for the individual listings
is identical to the Featured Listings page except that there is no "Add Listing" option. This
is because adding an individual listing must be done as described first under Details above and
illustrated in Figure 2.
4. Featured Listings-
Tutorial Video 5.4
Use Figure 6 (below) as a reference for the Featured
Listing function. Featured listings are entirely optional. They are a great place to list your non-cactus plants or supplies that you offer.
The idea is to call out some of your featured products, not to completely reproduce your web site on SucculentGuide.com. If you also sell Aloes, for
example, you may want to add one featured listing with information about the Aloe category and then link to the category rather than listing
every aloe as a featured listing. The number of listings allowed is essentially unlimited, but if you get too many, it will make for a cumbersome
page that visitors will likely want to avoid.
When you click on the link for the Featured Listings (Figure 1 #6) for the first time, there will be almost nothing on the page except for
a green "Add a Listing" link. (Figure 6 #2). (adding/editing a listing is discussed next -Figure 6a) As you add listings, the total number
of features you have and the number active vs. inactive will appear at the top. (Figure 6 #1) For convenience, you have the option of
making all listings active or inactive with one click. Below this, a summary of the listings is displayed. (Figure 6 #3) Pictures are used
in the listings, but not displayed on this page to keep it more manageable. For each individual listing, you can click a link to edit the
listing, delete it entirely, or activate/deactivate that specific listing. (Figure 6 #4)
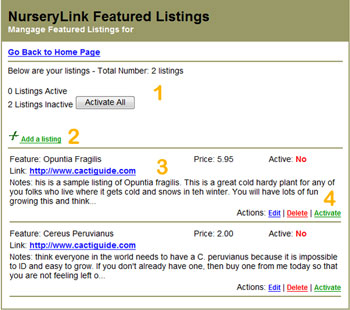
Figure 6 - Featured Listings Screen Shot
Clicking the "Add a Listing" link will take you to a form where you can enter the details of the featured listing along with
uploading a picture for the listing. The Item ID is entirely optional and can be a catalog number or even a field number for a plant. (Figure 6a #1)
The "Name or Title" field will is next and can be a plant name or a category description. (Figure 6a #2) The browse button allows you
to upload a moderate-sized image. (Figure 6a #3) The description field is a text area where you can enter all the details relevant to this
item. (Figure 6a #4). There are two price fields, "Price" and "Price Range". (Figure 6a #5) The price field is required.
If you only enter a price in the price field, that amount will be displayed with the listing in this format: "Price: 12.95 (USD)"
with the amount and currency that you specify for the listing. If you fill out the price range field then the price displays as a range on
your listing like so: "Priced From: 0.50 To: 10.80 (USD)" -again with the values you enter.
The last field is the link field (Figure 6a #6) where you enter a link to your web site. For best results, try to make the link as specific as
possible. If the listing is a single plant, link directly to that plant. If it is a category, link to the category. While you can
make every link simply go to your home page, visitors will be more likely to complete a purchase if they do not have to search for
the listing on your web site.
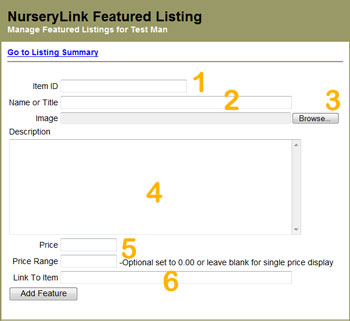
Figure 6a - Adding a Featured Listing Screen Shot
5. Additional Options-
Tutorial Video 5.5
Use Figure 7 (below) as a reference for the Additional
Options. For suppliers that wish to further maximize the NurseryLink feature, there are some additional options that may be set under the
"Additional Options" link. At the top of this page, there are three link fields where you can add links to the popular networking
sites, Facebook and Twitter, as well as to your Ebay store. (Figure 7 #1) These links must be used only for their intended purpose. Following
the link fields are two fields you can use to enhance your supplier page. The text area enables you to expand the information about your
nursery. (Figure 7 #2) If you do not fill this field out, the supplier page will use the brief summary information that you added on the
Nursery Summary page above. The last field is another image field where you can add a 300 pixel wide
image to go along with the text about your nursery. (Figure 7 #3) Ideally this would be an image of your greenhouse or other sales
area. You may also want to put a picture of you and your staff here -the choice is yours!
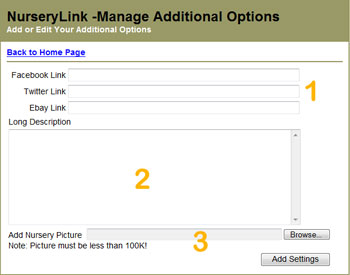
Figure 7 - Additional Options Screen Shot
6. Click Report-
Tutorial Video 5.6
Use Figure 8 (below) as a reference for the Click
Report. The "Click Report" is designed to help you maximize your listing performance and monitor the success of the
program as a whole. The report details display the listing that was clicked on (ex. Ariocarpus retusus, Featured Listing), the link type
(ex. Nursery Summary, Buy Page), the date and time of click, the user's IP, and the price of the click with a total amount at the bottom. (Figure 8 #1)
You will note that no click by the same IP can be done on the same listing twice. In this way, you never pay for a user who clicks on your
link several times, whether deviantly or inadvertently. By using the report sort functions at the top, you can get a clear picture of
which listings visitors are clicking on or view clicks from a certain date. (Figure 8 #3) These sort features can be used in conjunction with
one another. The default report displays the 100 most recent clicks and can be reset at any time by clicking "Reset Report". (Figure 8 #2)
When you have over 100 clicks, you may decide to see all of them by clicking the "View All" button. (Figure 8 #4)
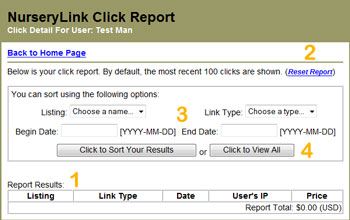
Figure 8 - Click Report Screen Shot
7. Manage Payments-
Tutorial Video 5.7
Use Figure 9 (below) as a reference for the Manage
Payments function. The "Manage Payments" page makes it easy for you to track the amount you've spent, your past payments, and
any amount due. Payment is due on the 1st business day of the month for all clicks of the previous month.
At the top of the payment page, the current date is included for convenience. (Figure 9 #1) Just below and prominent on the page is the
summary of clicks on your account for all time. (Figure 9 #2) This summary shows the total clicks and the calculation for the price for
those clicks. A grand total is shown at the bottom of the summary and is the same amount used below the payment history. (Figure 9 #3)
The payment history shows the date, amount and notes of your past payments. (Figure 9 #4) There are two other fields which don't have
an obvious meaning. The first, "Paid To Date" refers to the latest date of clicks that the the payment on that same line has covered. In
other words, a payment on March 24, 2010 may have covered clicks up to March 15, 2010. Payment is always applied to the oldest clicks
first. The "Last Paid Balance" refers to any amount of clicks on the "Paid to Date" that were not covered in that
payment. So if the payment on March 24 did not cover the cost of all clicks on March 15 (in our example), the balance will be shown here.
After the payment history, a calculation shows the total of all click charges, a total of all payments and the difference between the
two. (Figure 9 #5) This shows the amount due. A warning message will display here if the account goes past due. When you are ready
to make a payment, simply click the "Pay Now" button and complete the transaction via Pay Pal. Note: I manually accept and apply
all payments, so the payment information will not show up on the Payment Manager immediately.
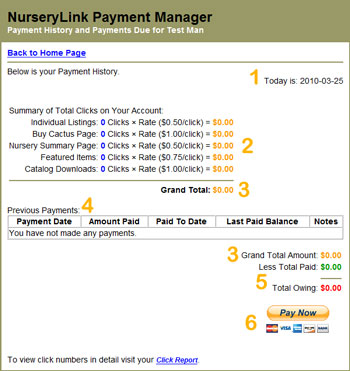
Figure 9 - Manage Payments Screen Shot
Conclusion
It is my desire to create long-lasting partnerships with quality nurseries by delivering quality leads. I am not interested in sending as many
clicks as I can, just to charge for them. I have many years of experience with internet marketing and I've applied that knowledge to ensure
that click-for-click, the SucculentGuide.com NurseryLink Application is the most valuable marketing tool for any cactus nursery. If you need
assistance with anything, feel free to contact me via the e-mail below. I will be happy to assist you!
|